Have you ever wondered if you can explore the wonders of science without stepping into a lab? The answer is a resounding yes! With just a few common household items, you can dive into exciting activities that spark curiosity and build essential skills.
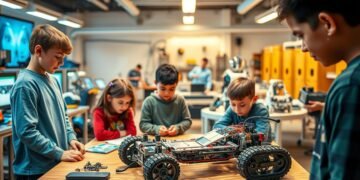
These hands-on projects are perfect for kids aged 3 to 11, making learning fun and accessible. From understanding basic physics to exploring chemistry, these activities are designed to inspire young minds. Plus, they’re a great way to prepare for future career opportunities, as studies show the importance of foundational skills in today’s world.
In this article, we’ll guide you through seven diverse projects that cover chemistry, physics, and engineering. Whether you’re at home or in a classroom, these ideas will transform everyday materials into tools for discovery.
Key Takeaways
- Science learning doesn’t require a lab—common household items work perfectly.
- Activities are tailored for kids aged 3 to 11, making them accessible and fun.
- Hands-on projects build problem-solving and critical thinking skills.
- These activities align with the importance of foundational skills for future careers.
- Seven diverse projects cover chemistry, physics, and engineering concepts.
What Are STEM Experiments?
Learning about science and technology can happen anywhere, even at home. STEM stands for Science, Technology, Engineering, and Mathematics. These subjects are the foundation of many real-world applications, from building bridges to developing new medicines.
Hands-on activities are a great way to explore these fields. They encourage trial and error, helping kids develop problem-solving skills. For example, figuring out why a balloon car doesn’t move teaches patience and critical thinking.
National STEM Day, celebrated on November 8, highlights the importance of early education in these areas. It’s a day to inspire curiosity and show how STEM subjects shape our world. Research from the Early Childhood STEM Working Group shows that kids naturally explore and learn through play.
These activities offer many benefits. They foster curiosity, introduce potential career paths, and make abstract concepts tangible. Whether it’s building a bridge or creating crystals, every project is a step toward understanding the world better.
Cloud in a Jar
Ever wanted to see how clouds form right in your kitchen? This simple activity lets you explore the water cycle and learn about evaporation and condensation. All you need are a few household items to create your own cloud in a jar.
Materials Needed
Gather these items to get started: a glass jar, a balloon, warm water, matches, and a flashlight. Adult supervision is required when using matches to ensure safety.
Steps to Create a Cloud
First, fill the jar about one-third full with warm water. Next, light a match and let it burn for a few seconds. Blow it out and quickly drop it into the jar. Immediately stretch the balloon over the jar’s opening. Finally, press down on the balloon to create pressure inside the jar. Watch as a cloud forms!
Key Concepts
This experiment demonstrates how clouds form in nature. The water cycle includes evaporation, where water turns into vapor, and condensation, where vapor cools and forms droplets. The smoke from the match provides nucleation sites for the droplets to form. This activity also shows how changes in pressure and temperature affect the states of matter.
Always remember to have an adult handle the matches. This project is a fun way to learn about meteorological processes and the science behind weather patterns.
Sticky Note Number Match
Turn sticky notes into a playful math learning tool. This hands-on activity is perfect for teaching numeric values to kids of all ages. It’s simple, customizable, and aligns with Common Core standards for cognitive development.

Materials Needed
Gather sticky notes, markers, and a large sheet of paper. These everyday items are all you need to create an engaging learning experience. Customize the difficulty by using dots for younger kids or equations for older ones.
Steps to Play
Start by writing numbers or equations on sticky notes. Place them randomly on the paper. Then, ask the child to match the sticky notes to the correct numeric values. For added fun, try timed addition races or fraction matching.
Key Concepts
This activity reinforces number recognition through kinesthetic learning. It helps kids understand numeric values while improving their problem-solving skills. The tactile nature of the game makes abstract concepts more tangible and engaging.
Crystal Sun Catchers
Creating beautiful crystal sun catchers is a fun way to explore science at home. This activity combines creativity with learning, making it perfect for kids and adults alike. With just a few simple materials, you can grow your own dazzling crystals and turn them into stunning window ornaments.
Materials Needed
To get started, gather Epsom salt, string, jar lids, and food coloring. These items are easy to find and affordable, making this project accessible for everyone. You’ll also need warm water and a heat-resistant container to create the solution.
Steps to Create Crystals
First, mix Epsom salt with warm water in a 1:1 ratio. Stir until the salt dissolves completely. Add a few drops of food coloring for a vibrant touch. Next, pour the solution into jar lids and place a piece of string in each one. Let the mixture sit undisturbed for several hours or overnight. As the water evaporates, crystals will form on the string.
Key Concepts
This project demonstrates the principles of supersaturation and nucleation. When the solution cools, the salt molecules bond together to form crystals. The process also highlights the role of evaporation and time in crystal growth. For best results, ensure the mixture is kept at a consistent temperature.
Once your crystals are ready, hang them in a sunny window to catch the light. This activity not only teaches scientific concepts but also creates a beautiful decoration. It’s a perfect blend of learning and creativity!
Building a Hand Crank Winch
Transform everyday objects into a functional winch with this easy DIY project. Using recycled materials, you can create a simple yet effective hand crank winch that demonstrates the principles of engineering and pulleysystems. This activity is perfect for understanding mechanical advantage and real-world applications.
Materials Needed
Gather these things: toilet paper rolls, straws, string, tape, and small weights. These common items are all you need to build your winch. Ensure safety by handling sharp edges carefully, especially when cutting materials.
Steps to Build the Winch
Start by attaching the toilet paper roll to a stable surface using tape. Insert a straw through the roll to act as the axle. Tie one end of the string to the straw and wrap it around the roll. Attach a small weight to the other end of the string. Finally, turn the straw to crank the winch and lift the weight.
Key Concepts
This project highlights the mechanical advantage of pulley systems. It also connects to historical uses of pulleys in construction and modern applications like elevators and cranes. By testing different weights, you can explore how the winch handles various loads.
Always supervise children during this activity, especially when handling sharp objects. This project not only teaches engineering principles but also encourages creativity and problem-solving.
Magnetic Slime
Discover the fascinating world of magnetism with a fun and gooey project. Making magnetic slime is a hands-on way to explore science while creating something unique. This activity is perfect for kids and adults alike, combining creativity with learning.

Materials Needed
To make magnetic slime, gather these items: white glue, neodymium magnets, iron filings, and liquid starch. Safety is important, so wear gloves when handling iron oxide powder. Keep magnets away from small children due to their strength.
Steps to Make Slime
Start by mixing white glue with liquid starch in a bowl. Add iron filings slowly, stirring until the mixture becomes slimy. Knead the slime with your hands until it reaches the desired consistency. Finally, use a neodymium magnet to explore its magnetic properties.
Key Concepts
This project demonstrates the behavior of ferrofluids, which are liquids that respond to magnetic fields. It also highlights the difference between Newtonian and non-Newtonian fluids. For added fun, place a piece of paper over the slime to visualize the magnetic field.
Magnetic slime has real-world applications, such as in MRI machines and robotics. This stem activity not only teaches scientific principles but also encourages curiosity and creativity. Always supervise children during this project to ensure safety.
Build-a-Bridge
Building a bridge from everyday materials is a fantastic way to explore physics and engineering concepts. This hands-on activity teaches the basics of structural design while encouraging creativity and teamwork. Whether you’re using uncooked pasta or gumdrops, this project is both fun and educational.
Materials Needed
Gather these simple items: uncooked pasta, gumdrops, and textbooks for weights. These materials are easy to find and perfect for testing the strength of your bridge. You’ll also need a flat surface to build on and a ruler to measure your structure.
Steps to Build the Bridge
Start by planning your design. Will it be a truss or an arch bridge? Use gumdrops to connect the pasta pieces, forming the base of your structure. Add layers to increase stability. Once complete, place textbooks on top to test its load-bearing capacity. Adjust your design as needed to improve strength.
Key Concepts
This project highlights the principles of tension and compression, essential in civil engineering. It also encourages collaboration, as working in teams can lead to more innovative designs. Compare your creation to famous bridges like the Golden Gate or Brooklyn Bridge to understand real-world applications.
Build a Balloon Car
Turn a simple balloon into a powerful car engine with this fun project. Using everyday recycled materials, you can create a car that moves by air pressure. This activity is a great way to explore physics and Newton’s laws in action.
Materials Needed
Gather these items: a plastic bottle, straws, bottle caps, and a balloon. These materials are easy to find and perfect for a DIY project. You’ll also need tape and scissors to assemble the car.
Steps to Build the Car
First, cut the plastic bottle in half lengthwise to create the car body. Attach straws to the bottom as axles. Use bottle caps as wheels and secure them to the straws. Next, tape the balloon to the top of the car, ensuring the nozzle faces backward. Blow up the balloon, place the car on a flat surface, and let it go!
Key Concepts
This project demonstrates Newton’s laws of motion. The air escaping the balloon creates thrust, propelling the car forward. It also highlights the importance of design optimization, such as reducing friction and balancing weight. For added fun, race your car against others to test speed and efficiency.
This activity connects to real-world applications like automotive engineering, especially in understanding how electric vehicles maximize efficiency. It’s a hands-on way to learn about physics while having fun!
Conclusion
Exploring science and technology at home has never been easier or more exciting. From creating clouds in a jar to building a balloon car, these activities cover a wide range of disciplines. They’re designed to spark curiosity and make learning fun for kids of all ages.
Adults play a crucial role in guiding these projects, encouraging inquiry-based learning and creativity. For extended exploration, consider hybrid tools like monthly experiment kits from platforms such as Big Bang STEAM. These resources make it easy to continue the learning journey.
Looking for more ideas? Check out top STEM toys and TV shows to keep the excitement alive. Don’t forget to celebrate National STEM Day on November 8th by trying a new project. Let’s inspire the next generation of innovators right from the comfort of home!
FAQ
What household items can I use for these activities?
You can use everyday items like jars, sticky notes, baking soda, vinegar, balloons, and rubber bands. These are perfect for creating fun and educational projects at home.
How do I make a cloud in a jar?
Fill a jar with warm water, place a lid on it, and add ice cubes on top. When you remove the lid, you’ll see a cloud form inside the jar. This demonstrates the water cycle in action.
What is the purpose of the sticky note number match game?
This activity helps kids practice counting and number recognition. It’s a simple way to combine learning with play using sticky notes and a marker.
How do I create crystal sun catchers?
Mix warm water with borax and pipe cleaners shaped into designs. Let the solution sit overnight, and you’ll have beautiful crystal formations. It’s a great way to explore chemistry.
What does building a hand crank winch teach?
This project introduces basic engineering and physics concepts. Kids learn about mechanical advantage and how simple machines work using cardboard, string, and a pencil.
How do I make magnetic slime?
Combine glue, liquid starch, and iron oxide powder. Add a magnet to see the slime move. It’s a fun way to explore magnetism and polymers.
What materials are needed to build a bridge?
Use popsicle sticks, glue, and paper clips. This activity teaches structural engineering principles and problem-solving skills.
How does a balloon car work?
Attach a balloon to a small car made from a plastic bottle or cardboard. When you release the air, the car moves forward, demonstrating Newton’s third law of motion.